Start here · 7 minute read
Set up access and understand account destinations
Separate AI access from broker access, verify the selected account, and find your saved settings.
What happens on first launch
Before you start: Have BrokerBridge open at setup. You can finish this beginner route without connecting a broker. Review the terms and consent choices yourself.
BrokerBridge starts with a short setup. Choose Start without a broker to use the Local account straight away: no activation code, broker account, or API key is needed. Depending on your installation, setup may also ask you to choose an AI model.
Choose Connect a broker to use Interactive Brokers or NinjaTrader. If setup asks you to activate, sign in at brokerbridge.tech, open your dashboard, copy your Desktop Activation Code, and paste it into the Access step. Setup then asks you to choose an AI model and connect the broker.
Both paths end by asking the most you want to lose on one trade, then show a review screen. Launching saves your settings and places no order. The Settings pages named in the rest of this chapter open after setup is finished; until then you can read every lesson here. You can connect or change a broker later in Settings → Broker Accounts.
Read the transcript
- Choose Start without a broker for the built-in Local account. Read and decide on setup agreements yourself.
- If managed model access is unavailable, Use Local Demo continues with fixed workflows. The Local account and AI model access are separate.
- In Chat, check Plan accounts and the model. Plans opens saved work. Local Demo is not an AI tutor; the written guide explains the basics.
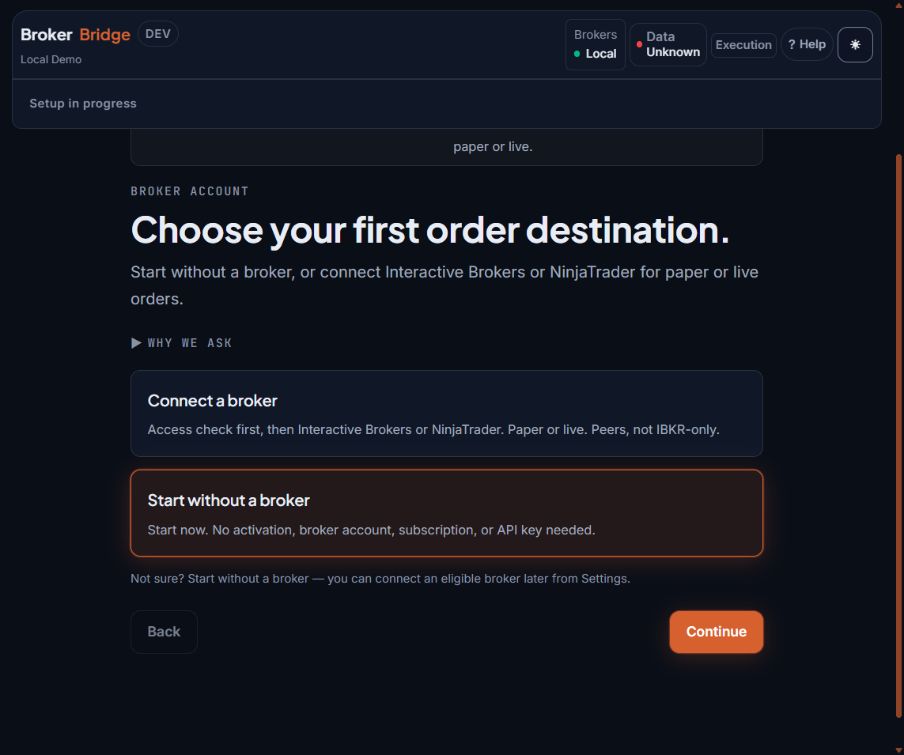
- Start without a broker: choose this path for the built-in Local account.
- Brokers → Local at the top identifies the current destination. Local Demo identifies the model; these are separate choices.
- Continue takes you through model access, risk settings, and the final review. Read and decide on the agreements yourself.
Two connections with different jobs
AI access provides the model that answers questions. A broker connection provides account information and, when authorized, accepts orders. Check each separately: model readiness does not prove broker readiness, and a connected broker does not prove orders are enabled.
Choose intentionally. Learning does not require a broker, switching an existing account, or enabling live trading.
- Open Models & Credits (in the desktop app)
- Open Broker Accounts (in the desktop app)
Local, broker paper/simulated, and live are different
Simulation helps you learn the controls. It cannot establish the price, speed, liquidity, fees, or emotional experience of a live trade. Switching the screen you are viewing does not retroactively move an existing order or holding to a different account.
| Destination | What it means | What to verify |
|---|---|---|
| Local account | Trades and fills are simulated inside BrokerBridge. They are not broker executions. Broker Accounts calls this choice Built-in simulator. | The selected destination and each plan say Local. It starts with $100,000 of simulated money and charges no commissions. Waiting orders are checked against market prices about every 30 seconds while BrokerBridge is running, so it needs an internet connection. |
| IBKR Paper | Orders are routed to the connected Interactive Brokers paper environment. The broker simulates execution. | The authenticated account and Paper Trading mode match the destination on your plan. |
| NT8 Sim | Orders use the selected simulated account on the connected NinjaTrader installation. | The specific account name is verified. A running NinjaTrader application alone does not identify the selected account. |
| IBKR Live or NT8 Live | Orders can use real money in the named connected account. | Account identity, live labels, order terms, and permission text all match your intention before any action. |
Verify model access
Before you start: Open Settings → Models & Credits after setup. Model access and the order destination are separate choices.
Local Demo, when offered, uses predetermined local workflows for account-risk review, planning, and journaling. It has no AI model and cannot replace open-ended AI research. It writes plan outlines in Chat but does not save plan cards; an explicit instruction such as “buy 10 shares of [symbol]” can still place a Local order. Model selection and order destination are separate choices.
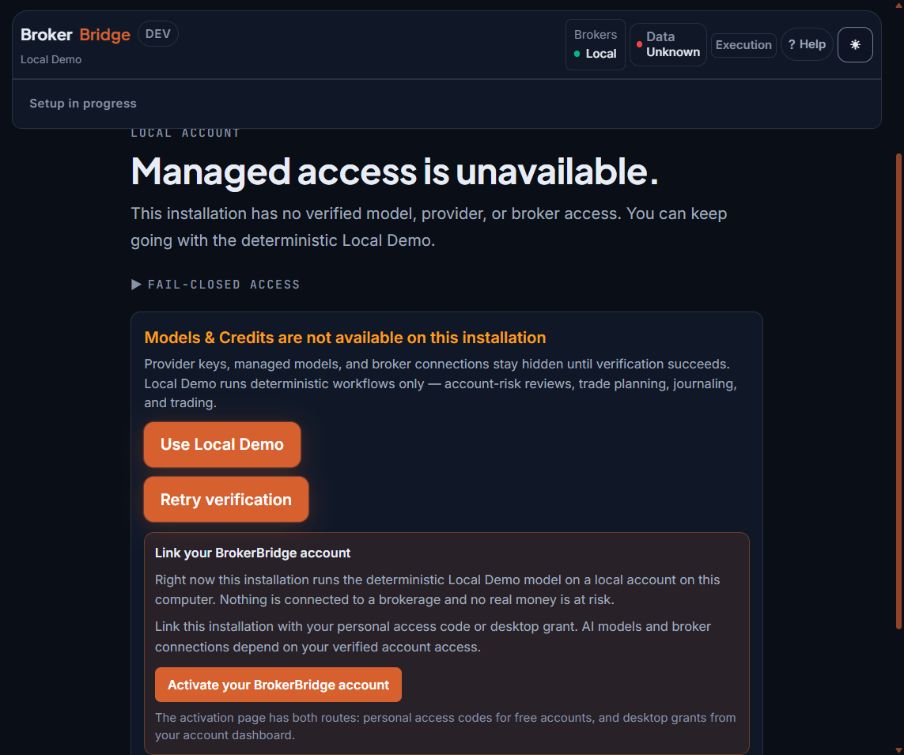
- Use Local Demo lets you continue when verified model access is unavailable.
- Local Demo provides fixed workflows. It is not an AI model for open-ended research or explanations.
- Activation and provider access are separate steps. A Local account does not by itself unlock an AI model.
Open Settings → Models & Credits
Read the options your installation shows: these may include BrokerBridge models and credits, subscription sign-in, or provider credentials.
You should see: A selected provider/model and its access state are named.
If you get stuck: Use the displayed verification or sign-in recovery; buying another service may not resolve it.
Complete the selected connection method
Follow its browser sign-in or connection fields. Provider-key connections are tested before saving. Not every account requires a personal API key.
You should see: The connection reports readiness after saving.
If you get stuck: Return from browser sign-in and read any remaining error before retrying.
Check the features you need
Read capability labels: Chat covers text, Vision covers images, and PDF indicates supported document reading. An absent label means the capability is unverified.
You should see: Your intended input is supported.
If you get stuck: For unavailable image or PDF reading, provide text or choose a compatible available model.
Confirm the account that answered
Before you start: Open Settings → Broker Accounts. For an initial IBKR connection check, keep Read-Only API enabled in IBKR.
Interactive Brokers turns on Read-Only API by default. Leave it on for your first connection test: balances and positions load, and no order can be sent. Before you send practice orders to IBKR Paper, turn Read-Only API off in the IBKR application's API settings and restart it, or your first order will be refused. A successful read is not an order test.
Open Settings → Broker Accounts
Read the Selected destination line, the connection status, and the account's Local, Paper, Sim, or Live label.
You should see: An exact account name or identifier matches the intended destination.
If you get stuck: Resolve missing, changed, or unverified accounts before ordering.
For Interactive Brokers, prepare the IBKR application
Open IB Gateway or Trader Workstation and sign in with the Trading Mode you intend: Paper Trading or Live Trading. In its API settings, enable ActiveX and Socket Clients if that control is shown. During first-launch setup, pick the matching application and Trading Mode, then choose Test broker connection. In Settings, use Connection presets, then Test Connection.
You should see: The test names the authenticated account and mode that answered.
If you get stuck: For Connection refused, keep the IBKR application open and check its Socket port: 4002 for IB Gateway with Paper Trading, 7497 for Trader Workstation with Paper Trading. A paper preset alone does not prove a paper login; read the mode the test reports.
For NinjaTrader, install the link, pair, and bind an account
NinjaTrader 8 must be installed and running on this same Windows PC. The first time, expand Install the NinjaTrader link in Broker Accounts and follow its steps: quit NinjaTrader, copy the link file into NinjaTrader's Custom folder, register the Machine ID the link prints, and restart NinjaTrader. Then choose Pair securely on this Windows host, choose the account, set its class, and choose Bind account.
You should see: The badge reads NT8 connected, and the bound account name and class are shown.
If you get stuck: UNVERIFIED usually means NinjaTrader or its link is not running; start both and retry. If the panel says entries are unavailable on this NinjaTrader build, update the link before relying on it. A generic Connected message does not identify the account.
Finish with a saved-settings check
- Open Risk & Trading and read each rule's value, unit, and explanation. Some rules use percentages; others use counts, ratios, or on/off settings. A position allocation and a planned loss are different limits. Leave each rule's Enabled box ticked while you learn.
- After changing a value, choose Save & Apply at the bottom of Settings. Wait for the success message, then reopen the section to confirm the saved value.
- Visit Dashboard and Journal so you know where account information and history appear. Empty history is expected for a new account.
- If a getting-started step refuses to save, address the reported error. Ticking checklist items does not unlock approval; the app checks your actual setup.
Continue in the website manual
The website manual keeps the detailed broker setup steps, prerequisites, videos, and transcripts. Choose the guide for your own destination and read its availability notes. A paper or simulation tutorial does not change the account you selected in the app.
The NinjaTrader beginner walkthrough is not available yet. Use Local for this learning path, or ask support about your installed NinjaTrader version before attempting that connection.
Check your understanding
Practice questions only. Answers do not change accounts, orders, or permissions.